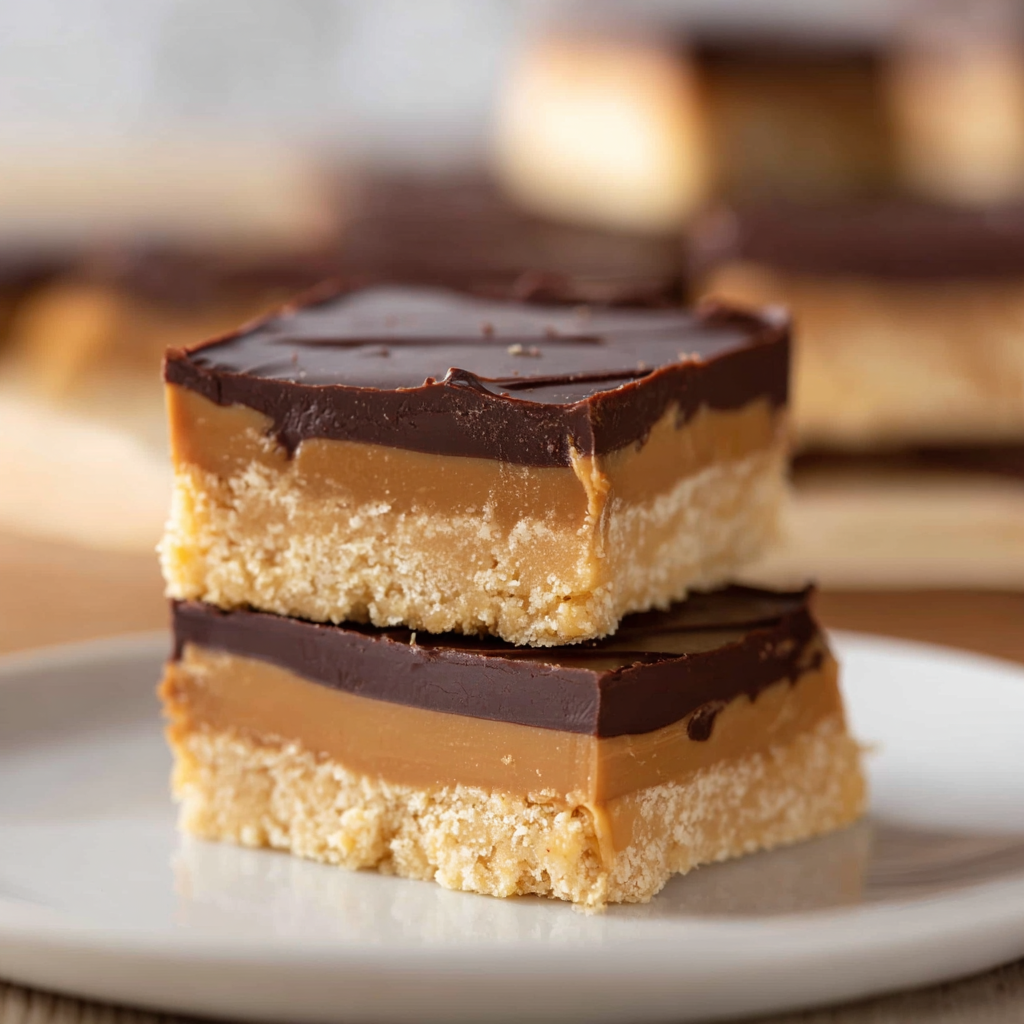
No Bake Buckeye Bars

Indulgent no-bake bars with a crunchy peanut butter and graham cracker base topped with a silky chocolate layer — an easy make-ahead crowd-pleaser.
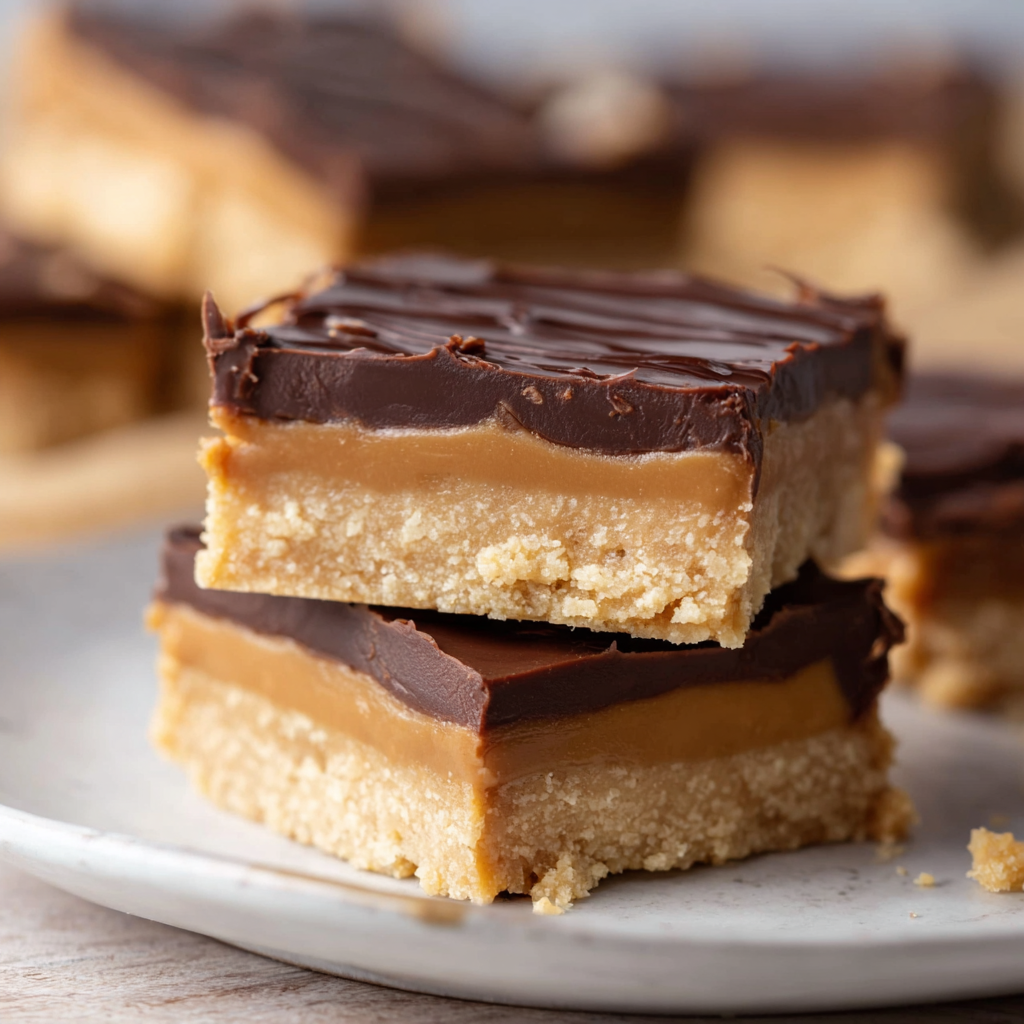
This recipe for No Bake Buckeye Bars has been a constant at holiday cookie exchanges and backyard potlucks in my family for years. I first stumbled on this combination during a frantic week of entertaining when I needed a dessert that travelled well, could be made ahead, and tasted like something special without fuss. The contrast between the crunchy, buttery graham cracker and peanut butter base and a glossy chocolate topping is pure comfort — sweet, slightly salty, and irresistibly creamy. Every time I take a pan out of the fridge, my kids and friends immediately circle the island; it disappears faster than I can slice it.
I love these bars because they capture the classic buckeye flavor in a tray-bake form: no dipping, no rolling, just press, melt, pour, chill, and slice. I typically make a double batch for gatherings and tuck a tray in the freezer for last-minute guests. The texture is dependable — a firm yet tender base that holds a clean bite and a chocolate cap that snaps slightly at the edge and melts on the tongue. Simple tools and pantry staples are all you need, which is why this is my go-to when I want a homemade dessert that feels indulgent but doesn’t take over the evening.
Why You'll Love This Recipe
- The assembly is quick: about 10 minutes active time and a short chill. Perfect for weeknight baking or last-minute entertaining.
- Uses pantry staples — graham crackers, creamy peanut butter, powdered sugar, and chocolate chips — so you can usually make it without a store run.
- Make-ahead friendly: it keeps well in the refrigerator and freezes beautifully for up to 3 months, making it ideal for planning ahead.
- Crowd-pleasing flavor: the peanut butter-to-chocolate ratio is balanced to taste indulgent but not overly sweet, pleasing both kids and adults.
- No oven required: perfect for hot days, dorm kitchens, or when you want dessert without heating the house.
- Scales easily — double or halve the quantities to fit your pan or occasion.
On multiple occasions I’ve taken these to neighborhood potlucks and been asked for the recipe by several people in the same night. They’re particularly appreciated by the peanut butter lovers in the group, and I’ve found that chilling them a bit longer yields cleaner slices for gift boxes or cookie trays. The recipe is forgiving: if you like a firmer base, add a little more graham crumbs; if you prefer a thinner chocolate layer, reduce the chips by a quarter cup.
Ingredients
- Graham cracker crumbs (2 cups): Pulse about 14 full graham cracker rectangles (28 squares) in a food processor until fine. The crumbs provide the crunchy backbone; don’t substitute with overly coarse biscuits or the texture will be gritty.
- Unsalted butter (1 cup / 2 sticks), melted: Melting the butter allows it to bind the crumbs and powdered sugar into a pressable base. Use real butter for the best mouthfeel; salted butter can be used if you reduce added salt elsewhere.
- Powdered sugar (2 cups): Confectioners’ sugar sweetens and helps the base set firm. Sift if it’s clumpy to avoid streaks in the dough.
- Creamy peanut butter (1 cup + 2 heaping tbsp): Smooth peanut butter blends more uniformly into the base and into the warm chocolate; chunky will add texture but change spreadability. I like a classic brand with just peanuts and salt.
- Chocolate chips (2 cups): Semi-sweet chips give a nice contrast to the sweet base. Use good-quality chips for a glossy melt; if using baking chocolate, add a teaspoon of neutral oil to maintain shine.
Instructions
Prepare the pan: Line a 9x9-inch square pan with parchment paper, leaving an overhang on two sides for easy removal. This prevents sticking and makes slicing neater. Lightly grease the parchment if you want an ultra-smooth release. Make the crumbs: Pulse whole graham crackers in a food processor until they become fine crumbs, about 20–30 one-second pulses. If you don’t have a processor, place crackers in a sealed bag and crush them with a rolling pin until uniform. Mix the base: In a large bowl combine 2 cups graham cracker crumbs, 1 cup melted butter, 2 cups powdered sugar, and 1 cup creamy peanut butter. Use a sturdy spatula or your hands (wear food-safe gloves) to press and fold until everything is fully incorporated and the mixture holds together when squeezed. Press into pan: Evenly press the peanut butter mixture into the prepared 9x9 pan, using the back of a measuring cup for a smooth finish. Aim for an even thickness to ensure consistent slices — about 1/2-inch thick. Prepare the topping: In a microwave-safe bowl, combine 2 cups chocolate chips and the remaining 2 heaping tablespoons creamy peanut butter. Microwave in 30-second bursts, stirring between, until fully melted and glossy. Take care not to overheat; chocolate can seize if it gets too hot. Assemble and chill: Pour and spread the melted chocolate mixture over the pressed base, smoothing with an offset spatula. Refrigerate for at least 1 hour until the chocolate is set. If you’re in a hurry, freeze for 30 minutes to firm up. Slice and serve: Lift the slab from the pan using the parchment overhang. Place on a cutting board and slice into 25 squares with a sharp knife warmed under hot water and wiped dry between cuts for clean edges.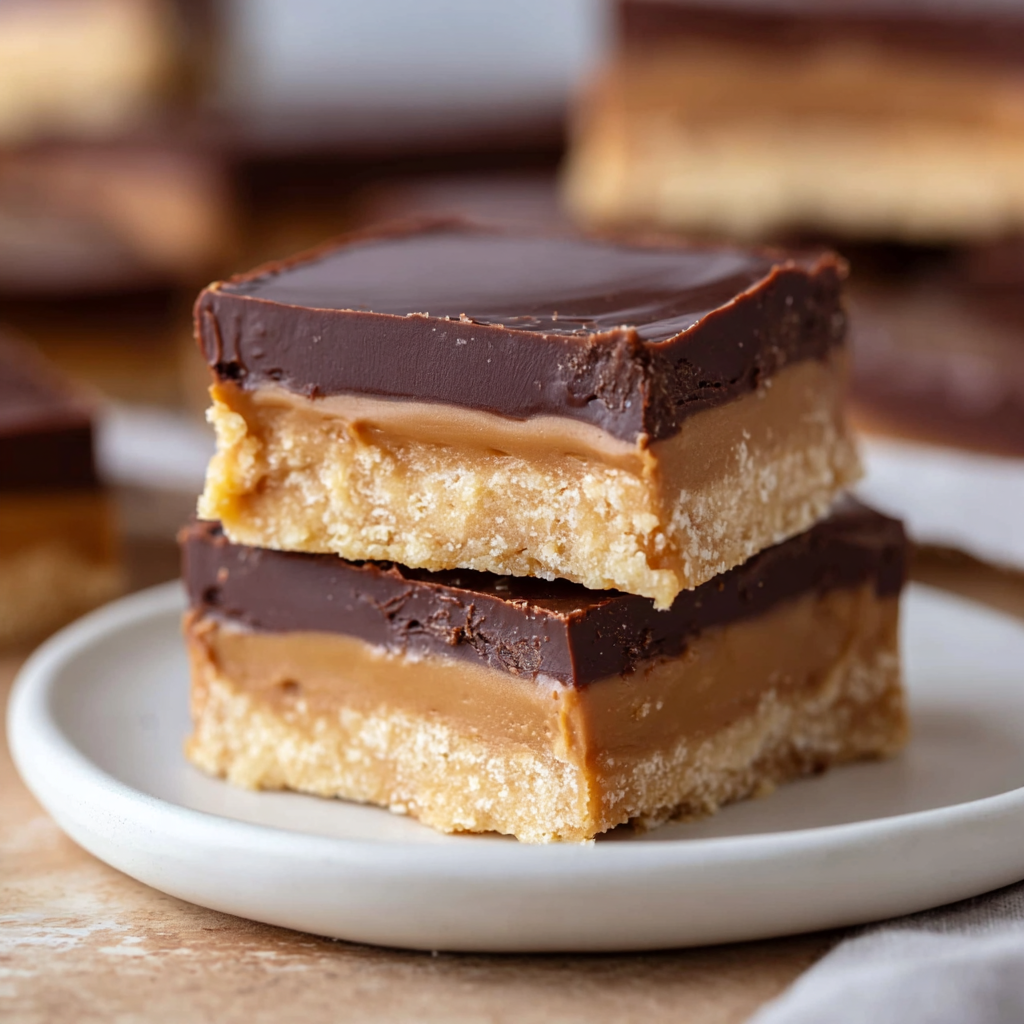
You Must Know
- These keep well in the refrigerator for up to 10 days in an airtight container and freeze well for up to 3 months.
- Because the base includes butter and peanut butter, the bars are high in fat and calories — slice modestly for a rich treat (approx. 263 kcal per square).
- If you need to speed things up, freezing for 30 minutes firms the bars faster than refrigeration.
- Use parchment with an overhang to remove the slab intact — this makes slicing safer and cleaner.
I always enjoy how reliably these bars perform: they arrive at parties intact, travel well in a cooler, and maintain a satisfying texture even after a day on the dessert table. One holiday I packed a tray into travel-safe boxes for neighbors and returned home to find a thank-you note and a request for the recipe — they were surprised it required so little effort.
Storage Tips
Store cooled bars in a single layer or in layers separated by parchment paper in an airtight container. Keep them refrigerated to maintain a firm, sliceable texture; they soften at room temperature, especially in warm environments. For longer storage, freeze in a tightly sealed container for up to 3 months. Thaw in the refrigerator overnight before serving. If you want to gift them, individually wrap squares in waxed paper and place them in a shallow tin to avoid crushing. Reheat is unnecessary — the chilled contrast between the base and chocolate is part of the charm.
Ingredient Substitutions
If you need to adapt the ingredients, there are several options. Swap graham crackers for digestive biscuits or gluten-free graham-style crumbs to make the base gluten-free, though texture will vary slightly. Use natural peanut butter for a more pronounced peanut flavor, but beware it can be oilier — stir thoroughly and chill longer. For a dairy-free version, choose a plant-based butter and dairy-free chocolate chips; the bars will set similarly but may be slightly softer. To reduce sweetness, cut powdered sugar by 1/2 cup and add a pinch of fine sea salt to balance the flavor.
Serving Suggestions
Serve chilled squares on a simple platter lined with parchment for easy pickup. Garnish with a light dusting of cocoa powder, a sprinkle of flaky sea salt, or a swirl of melted peanut butter on top for a decorative finish. These pair beautifully with strong coffee or milk for kids. For dessert plates, add a few fresh berries to cut the richness or a scoop of vanilla ice cream when serving at room temperature.
Cultural Background
The flavors are inspired by the classic Midwestern buckeye candy — a peanut butter center dipped in chocolate that resembles the Ohio buckeye nut. Transforming that concept into a no-bake bar makes it more accessible for large gatherings and saves the time-consuming dipping step. These bars echo the nostalgic Americana of holiday baking and potluck culture, where simple, comforting sweets are staples at community events and family tables.
Seasonal Adaptations
For winter holidays, add a teaspoon of cinnamon or pumpkin spice to the base for warmth. In spring, top with a scattering of chopped toasted peanuts or a few crushed pretzels for a salty crunch. For summer gatherings, substitute a portion of the chocolate with white chocolate and fold in chopped dried strawberries for a festive look. Small changes like using dark chocolate make the bars feel sophisticated for dinner parties while maintaining their approachable preparation.
Meal Prep Tips
These are ideal for meal prep and make-ahead planning. Prepare the base and chocolate topping separately, then assemble and chill the day before serving. Portion into single-serve containers or stack squares between parchment for grab-and-go snacks. If packing for lunches, keep refrigerated with an ice pack. I often make two pans at once, freeze one, and pull it out as needed for spontaneous hosting or an easy dessert to complement a weeknight meal.
Every time I make these bars, I’m reminded how small adjustments — timing the chill, the warmth of the chocolate, the firmness of the base — can elevate a simple tray to something that feels celebratory. I hope you enjoy them as much as my family does; they’re an effortless pleasure that travels well, keeps well, and always earns compliments.
Pro Tips
Warm your knife under hot water and dry it between slices for clean edges.
Press the base firmly into the pan using the back of a measuring cup for an even layer.
Use parchment paper with an overhang to lift the entire slab from the pan for easy slicing.
This nourishing no bake buckeye bars recipe is sure to be a staple in your kitchen. Enjoy every moist, high protein slice — it is perfect for breakfast or as a wholesome snack any time.
FAQs about Recipes
Can I speed up chilling time?
Yes — if you’re short on time, freeze the assembled pan for 30 minutes and the bars will firm up enough to slice cleanly.
How long do these keep?
Store in the refrigerator for up to 10 days in an airtight container or freeze for up to 3 months. Thaw in the fridge overnight.
Tags
No Bake Buckeye Bars
This No Bake Buckeye Bars recipe makes perfectly juicy, tender, and flavorful steak every time! Serve with potatoes and a side salad for an unforgettable dinner in under 30 minutes.
Instructions
Line the pan
Line a 9x9-inch square pan with parchment paper, leaving an overhang on two sides for easy removal. Lightly grease the parchment if desired.
Make graham crumbs
Pulse about 14 full graham cracker rectangles in a food processor until fine; alternatively, crush in a sealed bag with a rolling pin.
Mix base
In a large bowl combine 2 cups graham cracker crumbs, 1 cup melted butter, 2 cups powdered sugar, and 1 cup creamy peanut butter. Mix until the mixture holds together when squeezed.
Press into pan
Evenly press the mixture into the prepared pan using the back of a measuring cup to smooth the surface for uniform slices.
Melt topping
In a microwave-safe bowl, combine 2 cups chocolate chips and 2 heaping tablespoons creamy peanut butter. Microwave in 30-second intervals, stirring between, until smooth and glossy.
Assemble and chill
Spread the melted chocolate over the pressed base and refrigerate at least 1 hour until fully set. For faster results, freeze for 30 minutes.
Slice and serve
Lift the slab from the pan using the parchment overhang. Use a warm, sharp knife to cut into 25 squares and serve chilled or store refrigerated.
Last Step: Please leave a rating and comment letting us know how you liked this recipe! This helps our business to thrive and continue providing free, high-quality recipes for you.
Nutrition
Did You Make This?
Leave a comment & rating below or tag
@sararecipes on social media!
Categories:
You might also like...

10 Minute Immune Boosting Broth
A bright, restorative broth ready in ten minutes—packed with garlic, ginger, miso and turmeric to support immunity and soothe the soul.
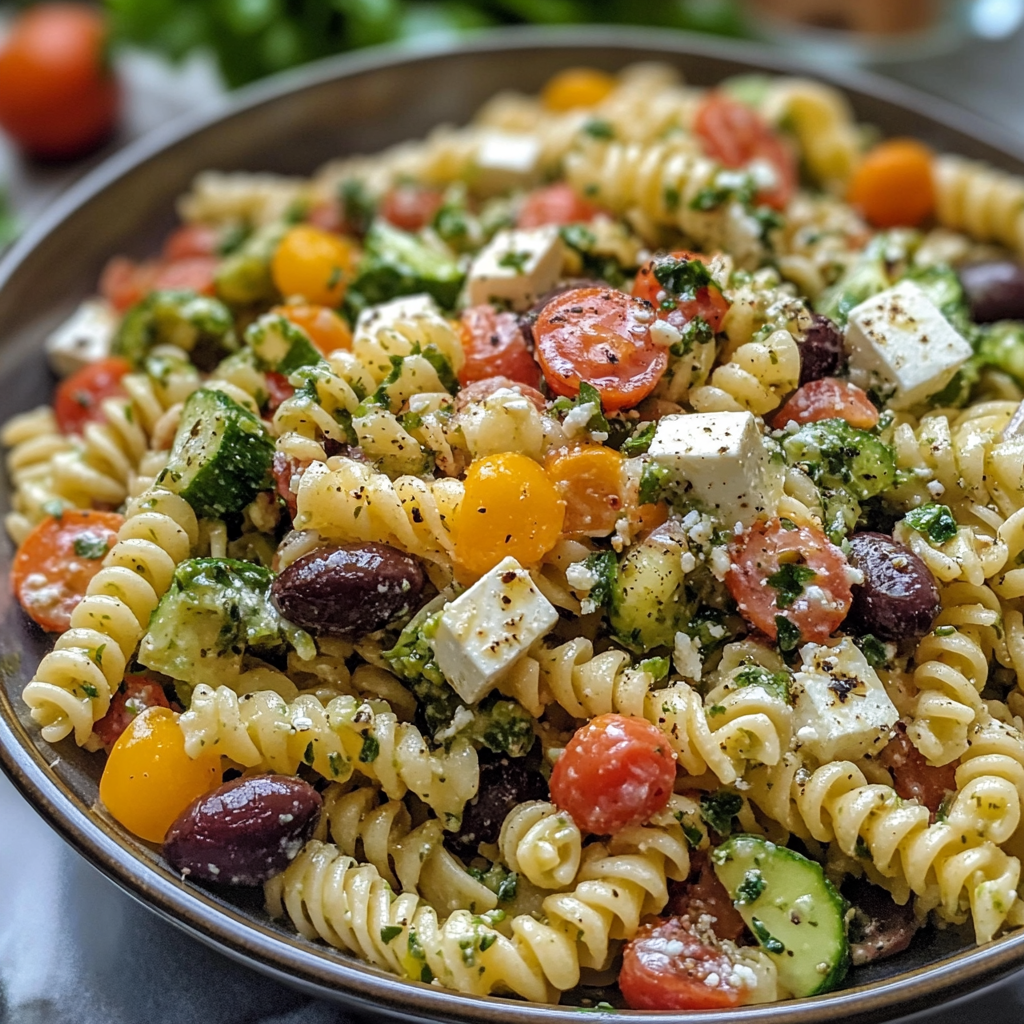
20-Minute Greek Pasta Salad
A bright, 20-minute Greek pasta salad loaded with crisp cucumber, cherry tomatoes, Kalamata olives, feta, and a tangy tzatziki vinaigrette — perfect for summer gatherings or easy meal prep.

Air Fryer Bang Bang Salmon Bites
Crispy-tender salmon bites tossed in a creamy, sweet-spicy bang bang sauce — ready in about 20 minutes using an air fryer or oven.
Did You Make This?
Leave a comment & rating below or tag @sararecipes on social media!
Rate This Recipe
Share This Recipe
Enjoyed this recipe? Share it with friends and family, and don't forget to leave a review!
Comments (1)
This recipe looks amazing! Can't wait to try it.
Comments are stored locally in your browser. Server comments are displayed alongside your local comments.
Hi, I'm Sara!
What's Popular
30-Minute Meals!
Join to receive our email series which contains a round-up of some of our quick and easy family favorite recipes.