
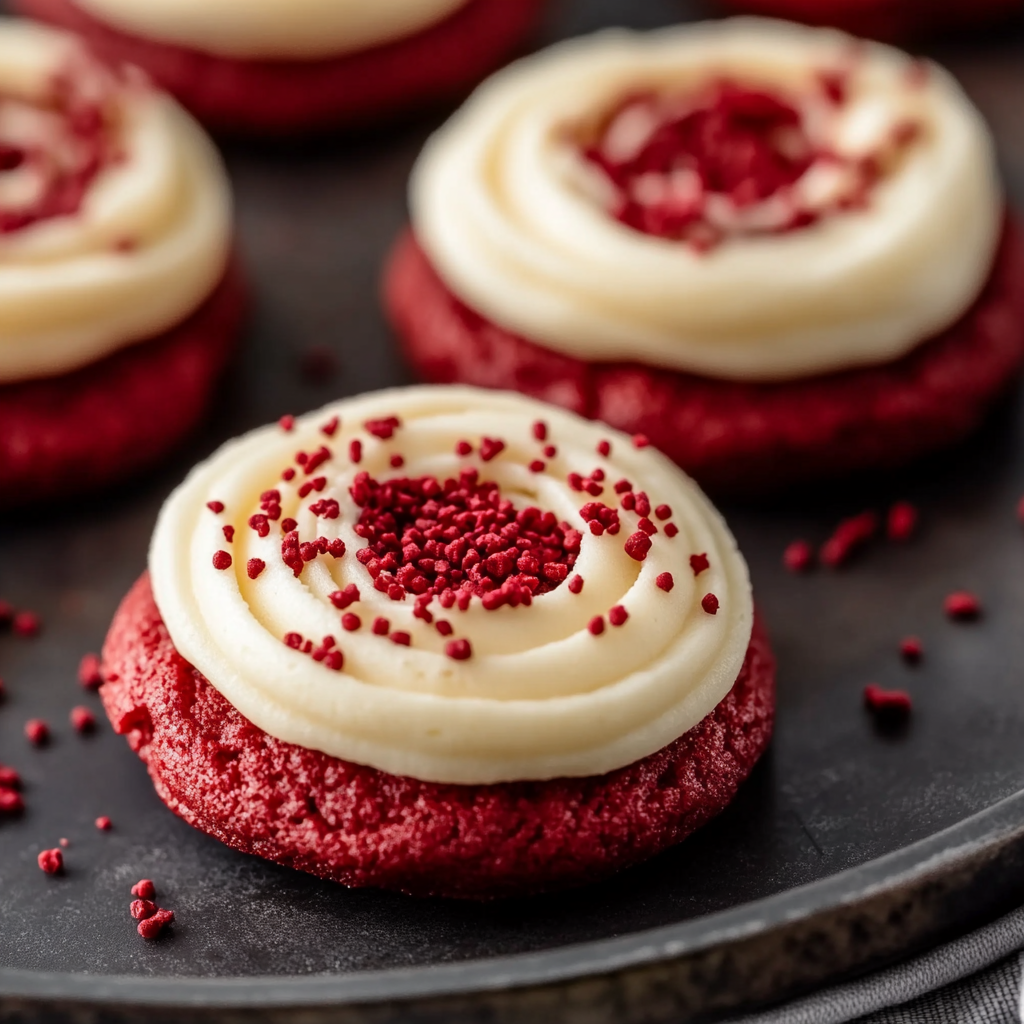
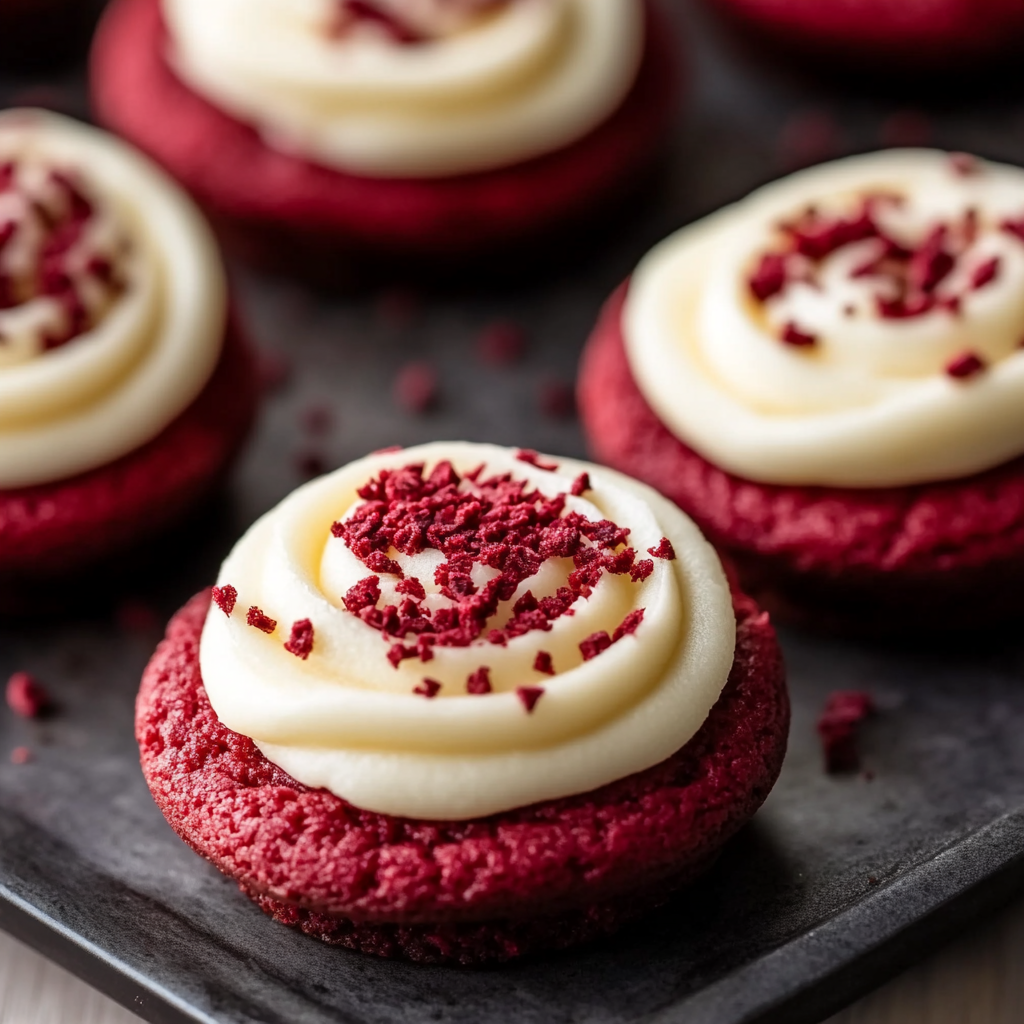
Frosted Red Velvet Cupcake Cookies

A delightful cross between a chewy cookie and a tender cupcake — domed centers topped with silky cream cheese frosting and cookie crumbs. Perfect for celebrations or cozy afternoons.
This recipe arrived in my life during a small dinner party when I wanted something festive but not fussy: a treat that felt like a cupcake but could be passed around like a cookie. The result was so beloved that it instantly became my answer to last-minute celebrations, an easy bake for kids' parties, and a way to use up leftover cream cheese in the refrigerator. The centers puff up and dome just like a cupcake top while maintaining that classic chewy cookie bite — a texture balance that's at once tender and satisfyingly substantial. I discovered the ideal balance between butter, oil and sugars during a weekend of recipe testing and the combination locked in a glossy, slightly chewy exterior with an airy interior.
I first made these on a rainy afternoon, and the house filled with the comforting scent of cocoa and brown sugar. Friends described them as “cupcakes in cookie clothing,” and that nickname stuck. The cream cheese swirl is deliberately silky — not rock-hard — so each bite melts on the tongue. The bright red from gel food coloring creates that iconic red velvet hue without affecting the dough's texture when you use gel instead of liquid coloring. These are the kind of treats I bring when I want to impress without spending hours: joyous, slightly decadent, and surprisingly quick to transform flour and pantry staples into something special.
Why You'll Love This Recipe
- Combines the best qualities of two favorites: the domed, tender top of a cupcake with the chewy, portable nature of a cookie — perfect for parties and bake sales.
- Quick to assemble and bakes in about 12 minutes; from start to finish most batches are ready in under an hour, making it ideal for last-minute baking.
- Uses pantry staples (flour, sugar, cocoa) plus a few fresh items — no specialty flours or long chilling times required, so it's approachable for home bakers.
- Silky cream cheese icing complements the cocoa notes and adds a luxurious finish; if you prefer, you can pipe or simply spread it for different looks.
- Make-ahead friendly: cookies freeze well un-frosted and frosting can be made in advance; easy to assemble on the day you need them.
In my experience, the family favorite moment is watching the domes form in the oven — it feels like magic. Guests usually ask whether they are cupcakes or cookies; I tell them they are both. These have become my go-to when I need something festive that doesn’t require tiered decorating or a cake stand.
Ingredients
- All-purpose flour: 1 & 1/2 cups — choose a good, soft flour like King Arthur or Bob's Red Mill for consistent results. Spoon the flour into the cup and level with a knife to avoid packing; flour gives structure while still allowing a tender interior.
- Unsweetened cocoa powder: 1/4 cup — use a natural unsweetened cocoa for bright chocolate notes; Dutch-processed will deepen color and flavor but may slightly change rise.
- Instant milk powder: 1 tablespoon — helps with tenderness and adds a subtle dairy roundness; Nestlé or store-brand is fine.
- Cornstarch: 1 tablespoon — softens texture for a cake-like interior while keeping the exterior slightly chewy.
- Baking powder & baking soda: 1/2 teaspoon baking powder and 1/4 teaspoon baking soda — together they create lift without making the cookie cakey.
- Salt: 1/4 teaspoon — balances sweetness and enhances cocoa flavor.
- Unsalted butter: 1/2 cup (1 stick), softened — provides richness and flavor; room-temperature butter creams easily with the sugars.
- Vegetable oil: 3 tablespoons — a neutral oil (canola or sunflower) keeps centers tender and moist; it also helps the cookie stay soft the next day.
- Brown sugar: 1/2 cup packed — adds moisture and a toffee-like depth; either light or dark works.
- Granulated sugar: 1/2 cup — for crisping the exterior slightly and balancing the brown sugar’s molasses notes.
- Large egg: 1, at room temperature — gives structure and lift; room temperature integrates evenly.
- Vanilla extract: 1 teaspoon — pure vanilla brings complexity to the sweet batter.
- White vinegar: 1 teaspoon — a classic red velvet tweak to gently react with baking soda and deepen flavor.
- Red gel food coloring: 1–2 teaspoons — gel coloring gives bright hue without adding unwanted liquid; AmeriColor or Wilton gels are reliable.
- Cream cheese: 3 ounces (for the frosting) — use block-style full-fat cream cheese for the best texture and flavor.
- Unsalted butter for frosting: 6 tablespoons, softened — creates a silky frosting when whipped with cream cheese and powdered sugar.
- Powdered sugar: 1 & 1/2 cups — sifted for a smooth frosting; add gradually to control consistency.
Instructions
Preheat and prepare: Preheat oven to 350°F (177°C). Line two large baking sheets with parchment paper and set aside. Properly preheating ensures the cookies puff and set quickly; parchment prevents overbrowning on the bottom. Whisk dry ingredients: In a medium bowl whisk together the flour, cocoa powder, instant milk powder, cornstarch, baking powder, baking soda and salt until fully combined. This even distribution prevents pockets of leavening and ensures a uniform crumb. Cream fats and sugars: In a large bowl, whisk together the softened butter, oil, brown sugar and granulated sugar until smooth and glossy. The combination of butter and oil produces both flavor and a tender interior; whisk just until combined to avoid overworking. Add eggs, vanilla and color: Whisk in the egg and vanilla until homogenous. Stir in the vinegar and add 1 to 2 teaspoons of red gel coloring until you reach the shade you like; the dough will look very bright now and deepen once the dry ingredients are mixed in. Fold in dry ingredients: Gently fold the dry mixture into the wet ingredients with a spatula until a thick, slightly sticky dough forms. Do not overmix; a few streaks are fine. The dough should hold together but be tacky to the touch — this yields the ideal domed rise. Scoop and space: Using a large cookie scoop (3 to 4 tablespoons) drop mounds of dough onto the parchment-lined sheets, leaving about 3 inches between each to allow for spreading and doming. Pressing the top slightly smooths the dome but isn’t necessary. Bake: Bake in the center of the preheated oven for 12 to 15 minutes until puffed and expanded; bottoms should be a very light golden brown. Visual cues matter more than exact time — look for evenly domed tops and a set edge. Cool before frosting: Cool the cookies on the baking sheet for about 5 minutes, then transfer to a wire rack and cool completely to room temperature before frosting. Frosting warm cookies will melt the frosting and make it slide off. Make the frosting and finish: Beat the cream cheese and butter until smooth and lump-free. Add vanilla and powdered sugar and mix until smooth. If the frosting softens too much, chill for 30 to 60 minutes. Pipe or spread the frosting onto cooled cookies and finish with cookie crumbs from any imperfect cookies for decoration.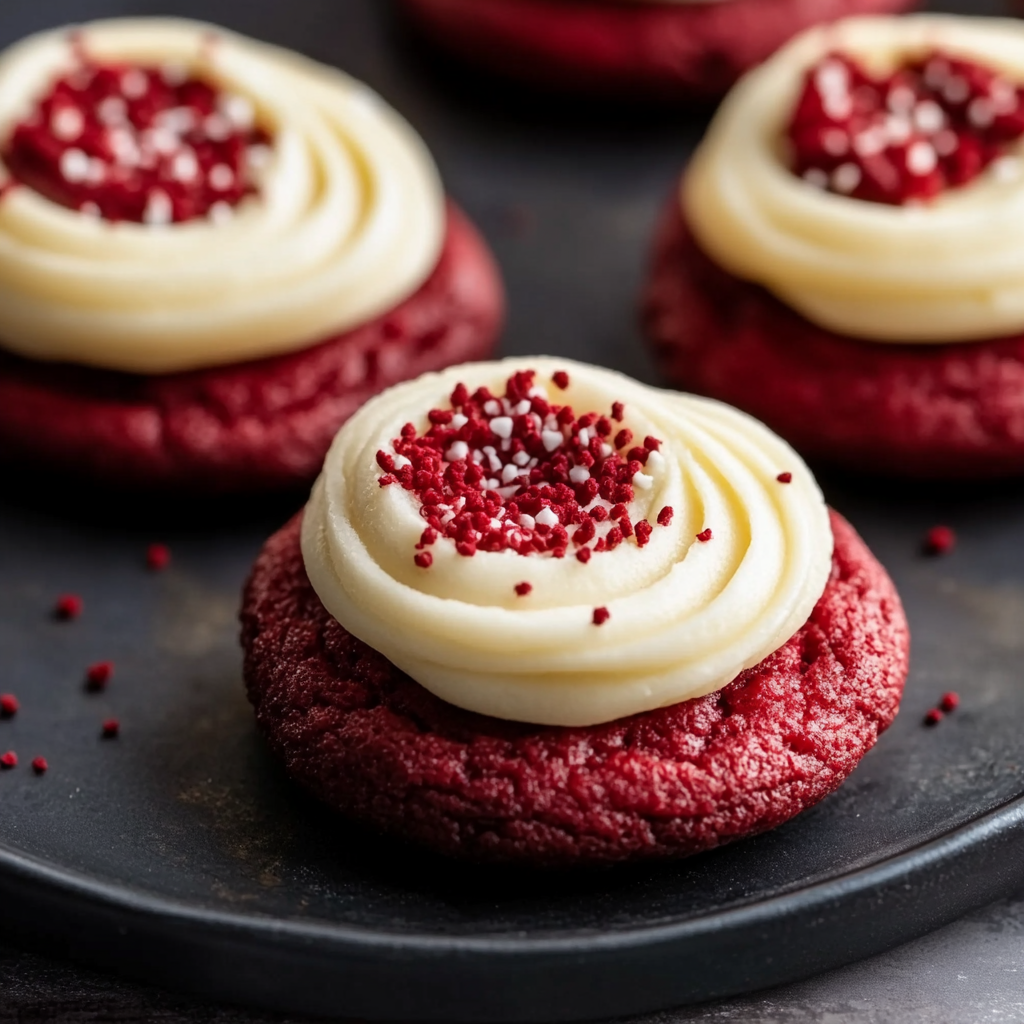
You Must Know
- Store in an airtight container at room temperature for up to 2 days; refrigerated up to 5 days (bring to room temperature before serving for best texture).
- Unfrosted cookies freeze well for up to 3 months; thaw overnight in the fridge and frost the next day for fresh presentation.
- High in fat and sugar — each cookie is rich and indulgent; consider splitting for smaller portions at parties.
- These are not suitable for gluten-free or dairy-free diets without ingredient swaps (see substitutions).
My favorite part is watching the domes arrive — it always feels like a small victory. Guests often tell me the frosting makes them nostalgic for classic red velvet cake, and the cookie format keeps the treat casual and convenient for gatherings.
Storage Tips
Store fully cooled and unfrosted cookies in an airtight container at room temperature for up to 48 hours; if they’re frosted, refrigeration is safer — place in a single layer or separate layers with parchment. To freeze, place unfrosted cookies on a baking sheet until firm, then transfer to a freezer-safe container or bag for up to 3 months. Thaw in the refrigerator overnight and bring to room temperature before frosting. For best frosting texture after refrigeration, let frosted cookies sit at room temperature for 20 to 30 minutes before serving.
Ingredient Substitutions
If you need to adapt, you can swap vegetable oil with light olive oil or melted coconut oil (note coconut flavor). For a dairy-free frosting, use a vegan cream cheese and vegan butter, but expect slight changes in tang and texture. To make gluten-free cookies, replace the flour with a 1-to-1 gluten-free blend that contains xanthan gum; results will vary and cookies may spread differently. Use gel food coloring rather than liquid to avoid altering moisture balance. Each swap will slightly affect rise, chew and color.
Serving Suggestions
Serve on a decorative platter with fresh berries or a dusting of cocoa for contrast. These are perfect with coffee or a milk station for kids. For holiday gatherings, top with white chocolate shavings or sprinkle freeze-dried raspberry powder for a tart counterpoint. They also work well as favors — package single cookies in cellophane tied with ribbon for a charming treat.
Cultural Background
Red velvet’s roots trace back to 19th-century American baking where interplay of cocoa, buttermilk and vinegar created a subtle red-brown hue. The brightly colored modern incarnation is often associated with Southern baking and celebratory cakes. Turning that concept into a cookie is a playful nod to tradition: you maintain the tang and cocoa of classic red velvet while offering a more portable, informal presentation.
Seasonal Adaptations
For winter holidays, add a pinch of ground cinnamon or a splash of orange extract to the dough for warmth. Spring and summer benefit from a lighter frosting — fold in a spoonful of whipped cream to make it less dense. Top with seasonal accents like crushed peppermint in December or lemon zest in summer for a bright twist.
Meal Prep Tips
Make the cookie dough a day ahead and keep it chilled in the fridge; bring to room temperature for 15–20 minutes before scooping if too firm. Frosting can be made 1–2 days in advance and kept refrigerated; whip briefly before piping to soften. For entertaining, bake a few extra — they store well and are great for last-minute guests.
These frosted red velvet cupcake cookies are a joyful mix of nostalgia and practicality. They’re forgiving, crowd-pleasing, and full of personality — bake a batch and see how quickly they disappear. Share them, tweak them, and make them your own.
Pro Tips
Use gel food coloring to maintain dough consistency and achieve a vibrant hue without adding moisture.
Scoop dough with a 3–4 tablespoon cookie scoop for even domes and consistent bake times.
Cool cookies completely before frosting to prevent melted frosting and sliding.
This nourishing frosted red velvet cupcake cookies recipe is sure to be a staple in your kitchen. Enjoy every moist, high protein slice — it is perfect for breakfast or as a wholesome snack any time.
FAQs about Recipes
Can I freeze these cookies?
Yes — freeze unfrosted cookies in a single layer until firm, then transfer to a freezer bag for up to 3 months. Thaw in the refrigerator and frost when ready to serve.
What kind of food coloring should I use?
Use gel food coloring to avoid adding extra liquid; if you use liquid coloring, add slightly less butter or reduce any added liquid elsewhere.
Tags
Frosted Red Velvet Cupcake Cookies
This Frosted Red Velvet Cupcake Cookies recipe makes perfectly juicy, tender, and flavorful steak every time! Serve with potatoes and a side salad for an unforgettable dinner in under 30 minutes.
Ingredients
Cookies
Frosting
Instructions
Preheat and prepare
Preheat oven to 350°F and line two large baking sheets with parchment paper. Proper temperature ensures puffing and quick set of the domes.
Mix dry ingredients
Whisk flour, cocoa, instant milk powder, cornstarch, baking powder, baking soda and salt in a medium bowl until evenly combined.
Cream fats and sugars
In a large bowl whisk together softened butter, oil, brown sugar and granulated sugar until smooth; this combination yields a tender interior and flavorful crust.
Add wet ingredients and color
Whisk in egg and vanilla, then stir in vinegar and gel food coloring until desired shade is reached. Dough will appear bright and will deepen after adding dry ingredients.
Combine and shape
Fold dry ingredients into wet until a thick, sticky dough forms. Use a 3–4 tablespoon scoop to portion dough onto prepared sheets, spacing about 3 inches apart.
Bake
Bake in center of oven for 12–15 minutes until puffed and edges are lightly golden. Look for domed tops and set edges rather than relying solely on time.
Cool and frost
Cool on sheet for 5 minutes then transfer to a wire rack to reach room temperature. Beat cream cheese and butter until smooth, add vanilla and powdered sugar, chill if too soft, then frost cookies.
Last Step: Please leave a rating and comment letting us know how you liked this recipe! This helps our business to thrive and continue providing free, high-quality recipes for you.
Nutrition
Did You Make This?
Leave a comment & rating below or tag
@sararecipes on social media!
Categories:
You might also like...

10 Minute Immune Boosting Broth
A bright, restorative broth ready in ten minutes—packed with garlic, ginger, miso and turmeric to support immunity and soothe the soul.
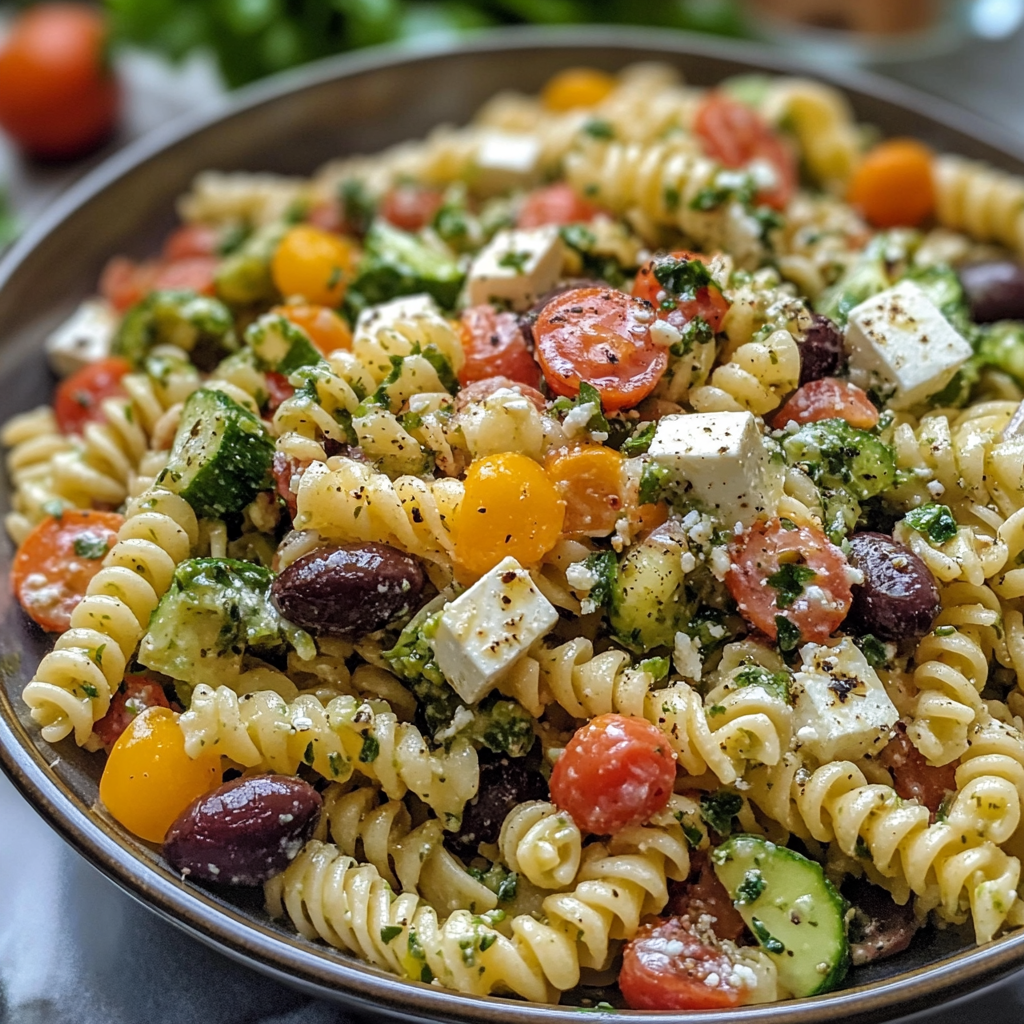
20-Minute Greek Pasta Salad
A bright, 20-minute Greek pasta salad loaded with crisp cucumber, cherry tomatoes, Kalamata olives, feta, and a tangy tzatziki vinaigrette — perfect for summer gatherings or easy meal prep.

Air Fryer Bang Bang Salmon Bites
Crispy-tender salmon bites tossed in a creamy, sweet-spicy bang bang sauce — ready in about 20 minutes using an air fryer or oven.
Did You Make This?
Leave a comment & rating below or tag @sararecipes on social media!
Rate This Recipe
Share This Recipe
Enjoyed this recipe? Share it with friends and family, and don't forget to leave a review!
Comments (1)
This recipe looks amazing! Can't wait to try it.
Comments are stored locally in your browser. Server comments are displayed alongside your local comments.
Hi, I'm Sara!
What's Popular
30-Minute Meals!
Join to receive our email series which contains a round-up of some of our quick and easy family favorite recipes.