
Classic Cherry Delight

A light, layered cherry dessert that combines a buttery graham crust, a creamy sweetened filling, and bright cherry pie topping — effortless, crowd-pleasing, and perfect for potlucks.
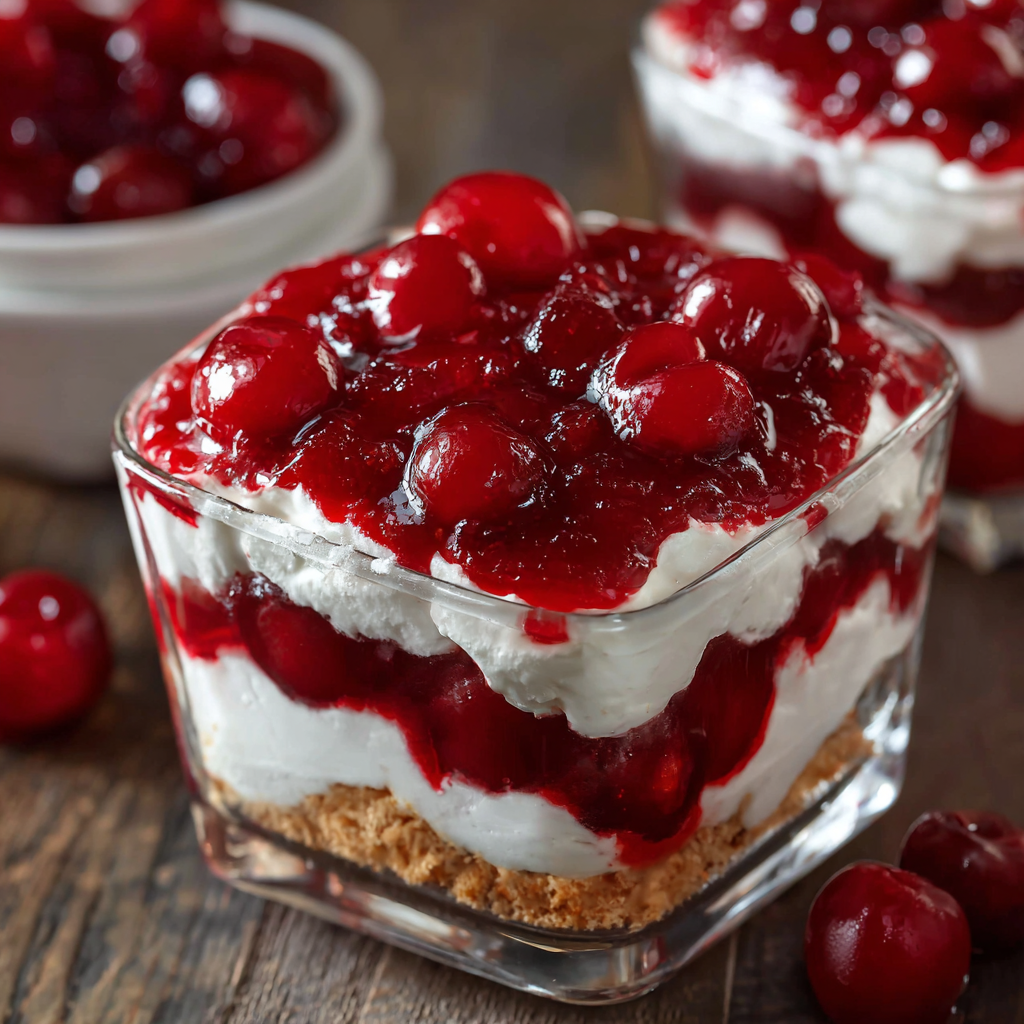
This Classic Cherry Delight has been my go-to easy dessert for years whenever I need something that looks special but comes together in minutes. I first made it on a humid June afternoon when guests arrived unexpectedly and my pantry offered graham crackers, cream cheese, and a can of cherry pie filling. The three-layer combination — a crisp buttery crust, a silky cream cheese layer, and glossy cherry topping — felt like a shortcut to something elegant. What surprised me was how the textures play so well together: the crumbly base gives a slight crunch, the filling is silky and just sweet enough, and the cherries add a bright, slightly tart finish that keeps every bite balanced.
I serve this when I want a dessert that won't weigh down a meal yet still looks inviting on the table. It's the recipe I bring to summer barbecues and casual family gatherings. Kids love the cherries on top, and adults appreciate that it's not overly sweet. I often prepare it the night before to let the layers settle and the crust firm up — that little rest in the refrigerator sharpens the flavors and makes slicing cleaner. This version uses pantry staples and a handful of easy steps, so you can make a memorable dessert without fuss or a long ingredient list.
Why You'll Love This Recipe
- This dessert is no-bake and comes together in about 30 minutes of active time, making it perfect for busy weeknights or last-minute gatherings.
- It uses pantry staples — graham crackers, butter, cream cheese, powdered sugar, and a can of cherry pie filling — so you can usually make it without a special store run.
- The texture contrast between the crisp crust, creamy middle, and juicy cherries creates a dessert that feels layered and indulgent without being heavy.
- Make-ahead friendly: assemble the day before and refrigerate for cleaner slices and deeper flavor melding.
- Kid-approved and crowd-pleasing: bright cherry topping appeals to kids, while adults enjoy the restrained sweetness and creamy texture.
- Flexible for variations — swap cherries for strawberry or blueberry or use gluten-free crumbs to accommodate dietary needs.
In my experience, this recipe reliably disappears fast at potlucks. My sister commented that the balance of creaminess and fruitiness reminded her of classic diner desserts, and a friend told me it was the easiest dessert she'd ever replicated at home. The simplicity and consistently pleasing result are why I return to it again and again.
Ingredients
- Butter (7 tablespoons): Use unsalted butter at room temperature before microwaving; I prefer Plugrá or Land O'Lakes for a clean flavor. Melt gently to avoid browning — the butter binds the graham crumbs and creates a crisp, tender base.
- Graham cracker crumbs (1 1/2 cups): About 9 whole Nabisco graham crackers crushed. You can pulse them in a food processor for even crumbs or place in a zip-top bag and crush with a rolling pin. Uniform crumbs compact better and create a sturdier crust.
- Granulated sugar (3 tablespoons): A little sugar in the crust enhances caramel notes from the graham crumbs and balances the tang of the filling.
- Cream cheese (8 ounces): One standard block of Philadelphia cream cheese, softened to room temperature for a smooth, lump-free filling. Full-fat cream cheese gives the best texture and stability.
- Powdered sugar (1 cup): Also called confectioners' sugar; it dissolves easily into the cream cheese and keeps the filling silky instead of grainy.
- Vanilla extract (1 teaspoon): Pure vanilla extract adds warmth and depth; avoid imitation if possible for a cleaner flavor.
- Cool Whip, 8 ounces: One standard container (Kraft Cool Whip works well) folded into the cream cheese mixture for lightness — if you prefer, use about 1 cup of homemade whipped cream (lightly sweetened) instead.
- Cherry pie filling (21 ounces): One can of cherry pie filling (e.g., Libby's or any store brand) for the glossy, fruity top layer; choose a filling with whole cherries for a prettier presentation.
Instructions
Prepare the crust: Measure 7 tablespoons of unsalted butter in a microwave-safe bowl and heat for 30 seconds or until fully melted. Combine with 1 1/2 cups graham cracker crumbs and 3 tablespoons granulated sugar, stirring until the mixture is evenly moistened. Press the crumbs firmly into the bottom of an 8 x 8-inch baking dish that has been lightly sprayed with nonstick spray. Use the bottom of a measuring cup to compress the crust evenly — this helps it set firm and slice cleanly. Set the pan aside while you prepare the filling; chilling the crust for 10 minutes can help it firm quicker. Make the filling: Place 8 ounces softened cream cheese in a large mixing bowl and beat with a hand mixer on medium until completely smooth and free of lumps, about 1-2 minutes. Add 1 cup powdered sugar and 1 teaspoon pure vanilla extract; mix on low to incorporate, then on medium for another 30 seconds. Gently fold in the 8-ounce container of Cool Whip until the mixture is uniform and airy — avoid overmixing to keep the filling light. Taste and adjust sweetness if needed (a touch more powdered sugar will sweeten without changing texture much). Assemble the layers: Spoon the cream cheese mixture over the pressed graham crust and use an offset spatula or the back of a spoon to spread it into an even layer, leaving the top smooth. Carefully spoon the entire 21-ounce can of cherry pie filling over the cream layer and spread gently to cover completely; take care not to press too hard or mar the filling layer. For a neater presentation, leave a small border of cream visible around the edges so the cherries sit on top rather than sliding off. Chill and serve: Cover the dish tightly with plastic wrap and refrigerate for at least 2 hours to firm up; however, I prefer chilling overnight — it slices more cleanly and flavors integrate better. When ready to serve, run a sharp knife under hot water and wipe dry, then slice into 9 squares. Store leftovers covered in the refrigerator for up to 3-4 days.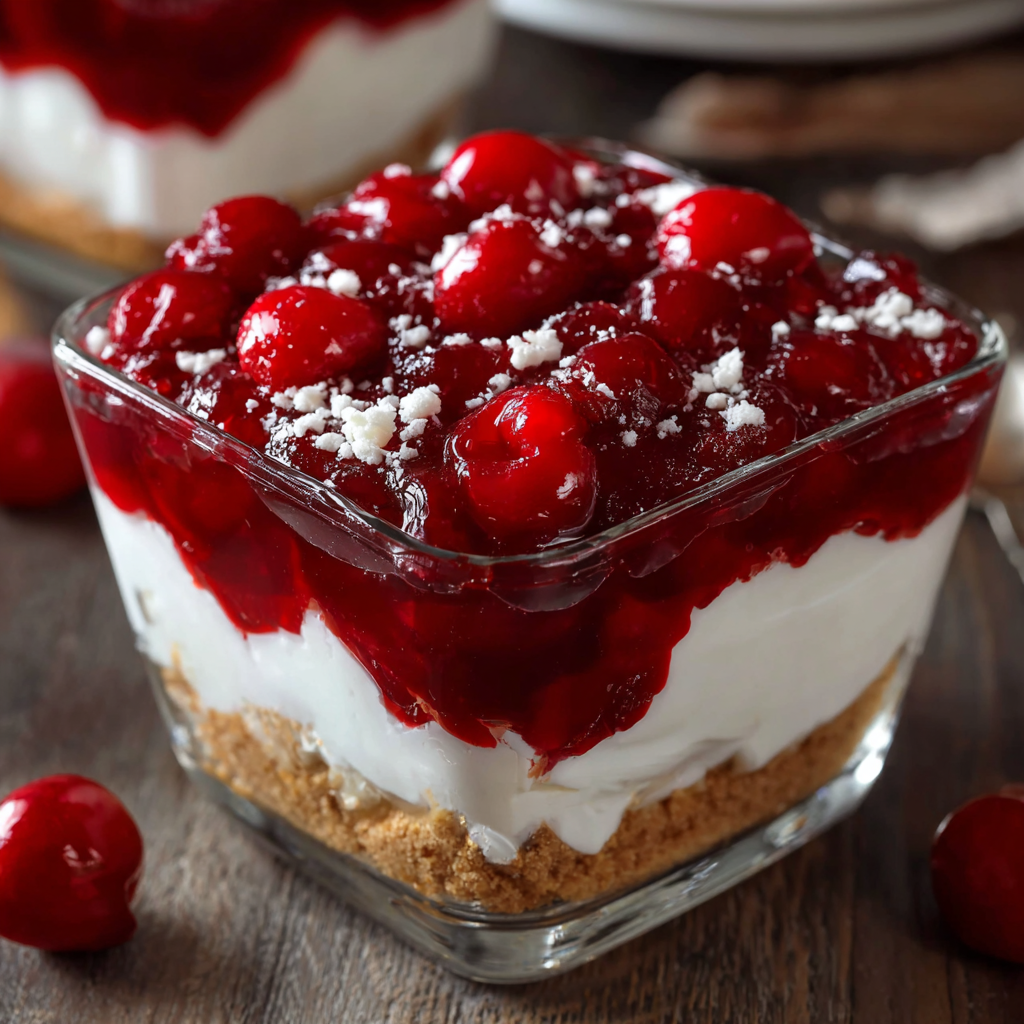
You Must Know
- This is primarily a cold-set dessert that requires at least 2 hours refrigeration; chilling overnight yields the best slices.
- Because the crust uses graham crackers, it contains gluten — swap with gluten-free crumbs if needed.
- Contains dairy from cream cheese and whipped topping; to reduce richness slightly, choose light cream cheese but expect slightly looser structure.
- Freezes reasonably well for up to 2 months—slice into portions and wrap individually, but note the cherries may soften after freezing and thawing.
My favorite part of this dessert is how reliably it performs. Serve it at room-chilled temperature so the filling is creamy but the crust still has structure. I once made this for a summer reunion and guests asked for the recipe on the spot — a sure sign it hit the right balance between sweet and bright. The simple technique and dependable result are what make this dish a keeper in my repertoire.
Storage Tips
Store any uneaten portions covered tightly with plastic wrap or in an airtight container in the refrigerator for 3 to 4 days. For the cleanest slices, chill the whole pan until very firm before cutting; heat a knife under hot water and dry the blade between cuts to prevent dragging. To freeze, cut into squares and wrap each piece in plastic wrap followed by a layer of aluminum foil, or place in a single-layer airtight container with parchment between layers to prevent sticking. Thaw overnight in the refrigerator before serving; note that the cherry topping may become slightly softer after freezing and thawing.
Ingredient Substitutions
If you need to make adjustments, there are simple swaps that preserve the character of the dessert. Use gluten-free graham-style crumbs or crushed gluten-free sandwich cookies to make it gluten-free; press firmly to replicate the texture of a regular crust. Replace Cool Whip with 1 cup of freshly whipped heavy cream whipped to soft peaks if you prefer homemade components. For a lower-sugar option, reduce powdered sugar by 1/4 cup and choose a reduced-sugar cherry topping, though sweetness balance may shift. For dairy-free adaptations, use dairy-free cream cheese and non-dairy whipped topping, though texture will be slightly different and may be less stable.

Serving Suggestions
Serve chilled squares on a dessert plate with a dollop of lightly whipped cream or a mint sprig for contrast. For a party, arrange them on a large platter and garnish each piece with a small fresh cherry or a few shaved dark chocolate curls to add a hint of bitterness that pairs beautifully with the sweet cherries. Pair with coffee or a lightly sweet white wine like a Riesling for a balanced finish. For a fun variation at children’s parties, top with a sprinkle of toasted coconut or colorful sprinkles.
Seasonal Adaptations
This layered dessert adapts nicely to whatever fruit is in season. In summer, swap cherry pie filling for fresh macerated strawberries or a homemade blueberry compote; toss berries with a tablespoon of sugar and a squeeze of lemon and allow to sit 20 minutes before using. In fall, consider a spiced apple topping with a touch of cinnamon and nutmeg; for the holidays, use a cranberry-orange compote and garnish with orange zest. Adjust sweetness slightly when using fresh fruit to preserve balance.
Meal Prep Tips
This is an excellent make-ahead dish: assemble up to 24 hours in advance and refrigerate. If you plan to transport it, place the assembled pan in a shallow cooler with ice packs to maintain temperature. For portion control, cut into 9 or 12 pieces depending on your crowd. Pack individual servings in reusable containers for lunches or potluck contributions — they keep well and look attractive when garnished just before serving. Keep extra cherry topping on hand in case you need to refresh the top layer after transport.
Success Stories
One memorable time I brought this to a family reunion, my father — notoriously picky about desserts — went back for a second helping and asked for the recipe. Another time a neighbor used the dessert for a bake sale and it sold out within the first hour, with people commenting on the creamy texture and bright cherry layer. Readers often tell me the simple assembly and make-ahead nature make this their emergency party dessert. Those small moments — compliments, requests for more, and repeat recipes — are why I love sharing it.
Make it your own, experiment with different toppings, and don’t be afraid to prepare it a day ahead — the results are reliably delicious and always welcome at any table.
Pro Tips
Soften the cream cheese to room temperature to avoid lumps — beat until completely smooth before adding other ingredients.
Press the graham crust firmly with the bottom of a measuring cup to create a dense base that slices well.
Heat a knife under hot water and dry it between cuts for the cleanest slices.
This nourishing classic cherry delight recipe is sure to be a staple in your kitchen. Enjoy every moist, high protein slice — it is perfect for breakfast or as a wholesome snack any time.
FAQs about Recipes
How long should I refrigerate before serving?
Chill at least 2 hours; overnight is best for clean slices.
Can I make this gluten-free?
Yes — use gluten-free graham-style crumbs and check labels on toppings.
Can I freeze leftovers?
You can freeze individual portions up to 2 months; thaw in the refrigerator overnight.
Tags
Classic Cherry Delight
This Classic Cherry Delight recipe makes perfectly juicy, tender, and flavorful steak every time! Serve with potatoes and a side salad for an unforgettable dinner in under 30 minutes.
Ingredients
Crust
Filling
Instructions
Prepare the crust
Melt 7 tablespoons unsalted butter in a microwave-safe bowl for about 30 seconds. Combine with 1 1/2 cups graham cracker crumbs and 3 tablespoons granulated sugar until evenly moistened. Press firmly into the bottom of a lightly sprayed 8 x 8-inch baking dish, compacting with the bottom of a measuring cup. Chill briefly if desired before adding the filling.
Make the filling
Beat 8 ounces softened cream cheese until smooth using a hand mixer. Add 1 cup powdered sugar and 1 teaspoon vanilla; mix until combined. Fold in the 8-ounce container of Cool Whip gently to keep the mixture airy. Avoid overmixing to maintain light texture.
Assemble and top
Spread the cream mixture over the pressed crust using an offset spatula. Spoon the entire 21-ounce can of cherry pie filling on top and spread gently to cover the surface evenly, leaving a neat edge if desired.
Chill and serve
Cover the pan and refrigerate for at least 2 hours, preferably overnight, to allow layers to set. For neat slices, run a sharp knife under hot water, dry it, and slice into 9 squares. Store leftovers covered in the refrigerator for up to 3-4 days.
Last Step: Please leave a rating and comment letting us know how you liked this recipe! This helps our business to thrive and continue providing free, high-quality recipes for you.
Nutrition
Did You Make This?
Leave a comment & rating below or tag
@sararecipes on social media!
Categories:
You might also like...
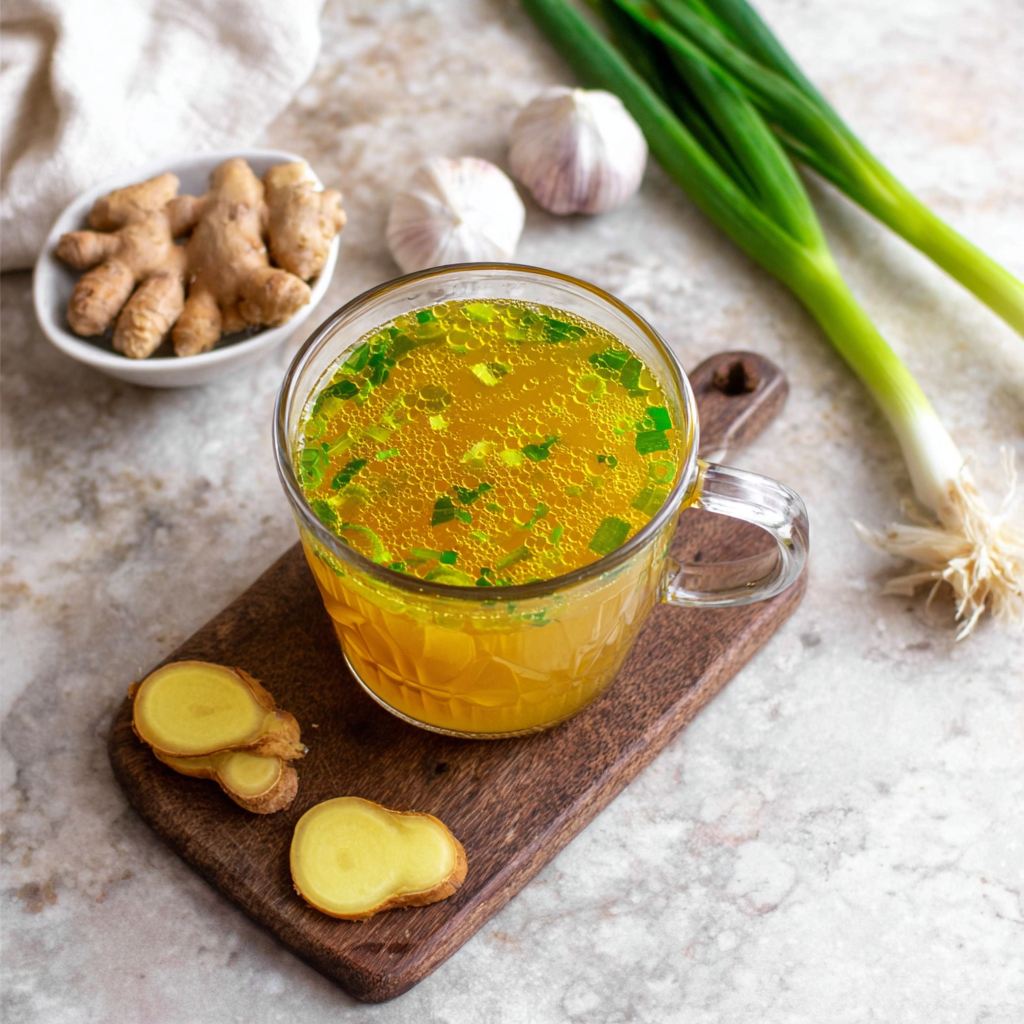
10 Minute Immune Boosting Broth
A bright, restorative broth ready in ten minutes—packed with garlic, ginger, miso and turmeric to support immunity and soothe the soul.
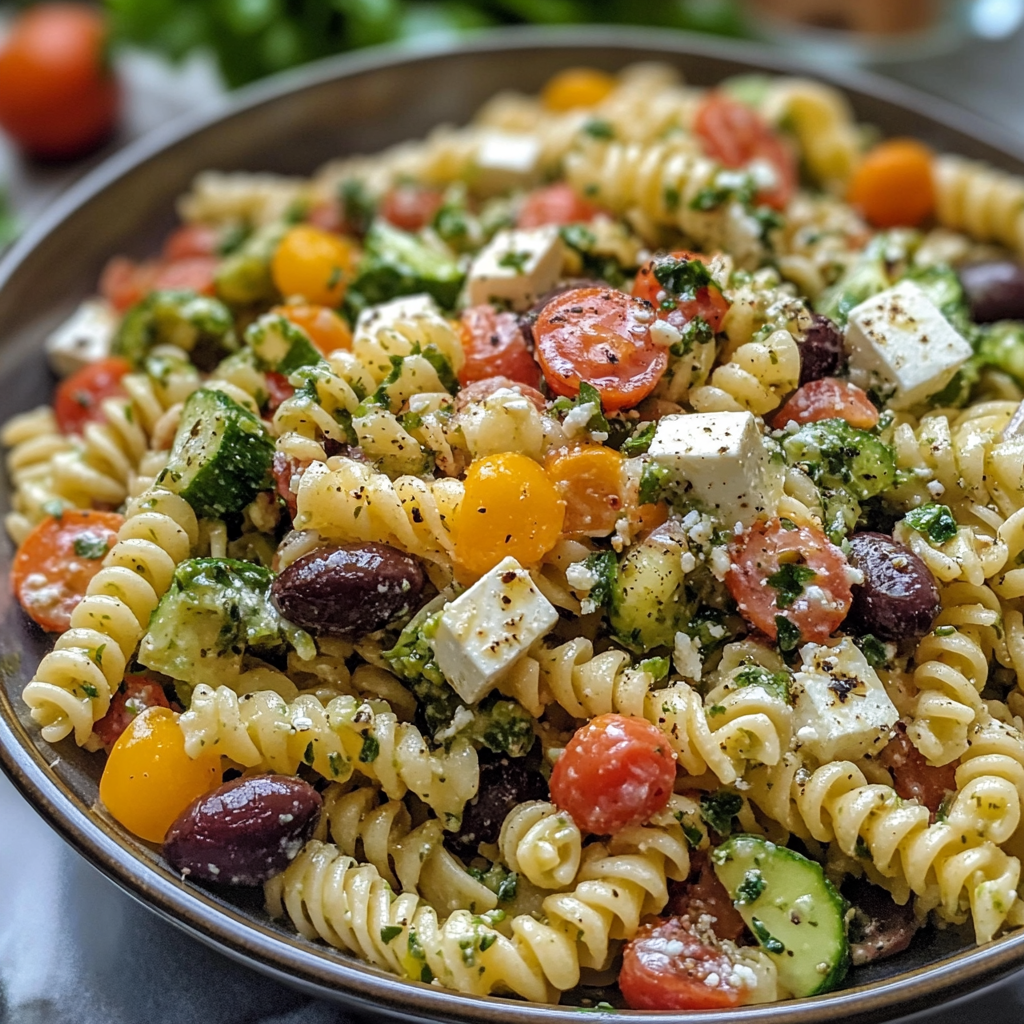
20-Minute Greek Pasta Salad
A bright, 20-minute Greek pasta salad loaded with crisp cucumber, cherry tomatoes, Kalamata olives, feta, and a tangy tzatziki vinaigrette — perfect for summer gatherings or easy meal prep.
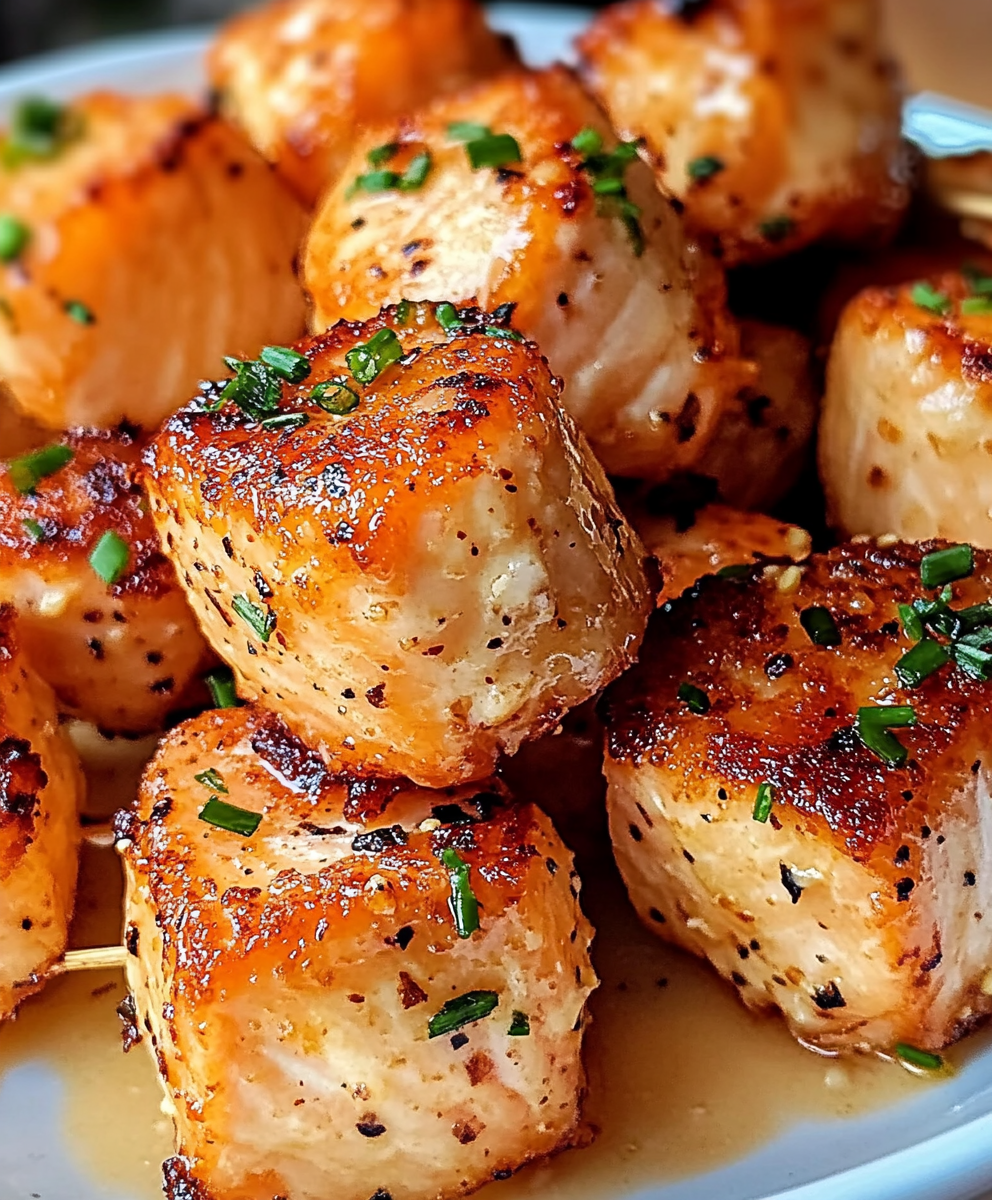
Air Fryer Bang Bang Salmon Bites
Crispy-tender salmon bites tossed in a creamy, sweet-spicy bang bang sauce — ready in about 20 minutes using an air fryer or oven.
Did You Make This?
Leave a comment & rating below or tag @sararecipes on social media!
Rate This Recipe
Share This Recipe
Enjoyed this recipe? Share it with friends and family, and don't forget to leave a review!
Comments (1)
This recipe looks amazing! Can't wait to try it.
Comments are stored locally in your browser. Server comments are displayed alongside your local comments.
Hi, I'm Sara!
What's Popular
30-Minute Meals!
Join to receive our email series which contains a round-up of some of our quick and easy family favorite recipes.